

The Dough Diaries: Mini Challah Loaves

As soon as I decided to do a dough series, I started rifling through all of my favourite cookbooks. I’ve been on a mission recently to use my cookbooks more, & this was the perfect excuse to explore new recipes. I wanted to have a varied range of doughy goods, & what’s more varied than a challah bread? Not only had I never baked a challah loaf before, but I’d also never actually tasted it before either. Before baking this, all I knew was that it was a lightly sweetened, moist, Jewish bread that is usually braided. What I wasn’t aware of was how addictively good it is, or how perfect it is for French toast.
Obviously the cookbook that came to mind when I thought of making challah was Molly on the Range. It’s one of those cookbooks that we’re constantly looking through. It’s always either open on the kitchen table or beside me on the desk for inspiration. The book itself has received one of the highest honors in our house: when we talk about recipes from it we just say “it’s a Molly recipe”. It makes it sound like we’re best pals with Molly Yeh, although this definitely isn’t the case.
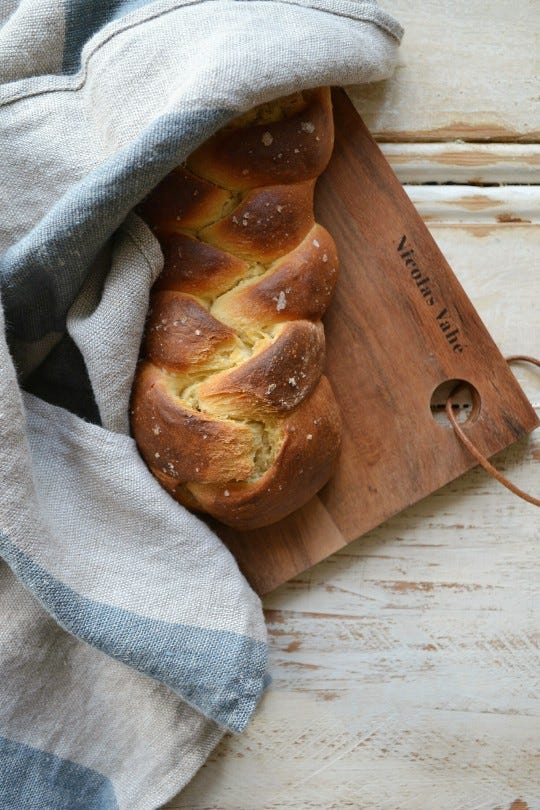
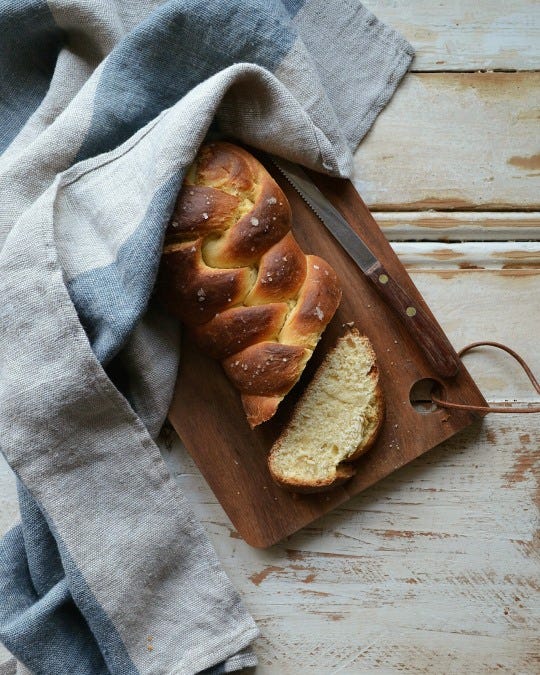
Challah has fast become our new go-to bread. It’s easy to make, it looks impressive, & it is downright perfect for french toast. In the last month alone, I’ve made two large & four mini challah loaves. And we’ve had more French toast than I’d like to admit. It’s moist & squishy, it’s a little bit sweet, it’s super adaptable, it has a nice salty crust, & it makes the perfect snack when lightly toasted and lathered with butter. It also freezes well! So if you bake up a whole bunch of challah, slice them & pop into the freezer for when that French toast craving hits. Trust me, Boyfriend & I have taken the plunge & truly tested this theory. It works.
If you like a good challah, then come back next week to see this get transformed into a chocolate babka!
Mini Challah Loaves
Two perfect mini challah loaves – perfect for making french toast with.
Yield: 2 mini loaves
Author: Passionate Baker, adapted from Molly Yeh
INGREDIENTS
1 7g packet of dried active yeast
3/4 cup warm water (nearly cool)
1/2 tsp caster sugar
—
1/8 cup caster sugar
3.25 cup plain flour, plus more for dusting
1 tsp salt
—
2 eggs
1/3 cup flavorless oil
1/8 cup caster sugar
water, for washing
flaky sea salt, to finish
DIRECTIONS
In a small bowl, lightly whisk together the yeast, warm water & ½ teaspoon of sugar. Leave to develop for 5-minutes, until slightly foamy on top.
Meanwhile, we get the rest of the ingredients ready. In a large bowl, whisk together the caster sugar, the flour, & the salt. In a separate medium bowl, whisk together the eggs, oil, & sugar.
When the yeast is ready, add it to the flour mixture, immediately followed by the egg mixture. Stir everything together & turn it out onto a lightly floured surface; knead the dough by hand for 5-7 minutes, or until the dough feels smooth, supple, & only slightly sticky.
Transfer the dough to a large oiled bowl, cover it with cling film, & leave it to rise in a warmish area for about 2 hours, or until it has doubled in size. (It was freezing when I made this, so I left my dough near the radiator.)
Line a large baking sheet with parchment paper & set aside.
Once the dough has doubled in size remove from the warm area & begin the shaping. Divide the dough in half & leave one of the halves in the covered bowl while you shape the other. On a lightly floured surface, pat the dough out into a long rectangle (roughly 3 x 12-inches) & use a sharp knife to cut the dough into 3 long snake-like shapes of equal size. Pinch the shapes together at one end, braid them together as you would hair, and then pinch together at the other end when finished. (I had to watch a YouTube tutorial on this, as I panicked at the last minute & forgot how to braid.)
Once shaped, transfer the loaf to the baking sheet & repeat with the second half of the dough. Leave the two loaves to rise – covered with cling film on the baking sheet – for a further 30 minutes while you preheat the oven to 180C.
Before baking in the oven, brush the loaves with a light layer of water & top with a generous sprinkle of sea salt. Bake until the loaves are golden brown in colour & baked through, about 25-30 minutes. Leave to cool slightly, then enjoy a warm slice slathered with butter.
Did you make this recipe? I’d love to know! Please leave a comment & a rating below, or tag me on Instagram @imvcki. Thank you so much for supporting Passionate Baker!
The post The Dough Diaries: Mini Challah Loaves appeared first on Passionate Baker Travels.